Thursday, November 5, 2015

White Chicken Enchiladas

This is a great recipe for anyone (I'm thinking mainly of my children) who do not like spicy food.  This still has great flavour but it doesn't have any real spice.  I found this in my Pioneer Woman Cookbook - Food From My Frontier.  I love her family style dishes, that are satisfying, easy and full of flavour.  Food doesn't have to be complicated to taste good!

I first made this with my neighbour, Haley in the summer.  We all liked it even the kids.  I usually make enchiladas with a tomato paste based sauce but anytime my kids see a tomato sauce they automatically think it is spicy!

I do find this dish is lovely and creamy, it is on the mild side, so personally, I add a dash of hot sauce to mine (once the dish is complete) - I like a slight kick but that is completely optional. 

The other great thing about this recipe is the ingredients are so simple, you probably have just about everything on this list in your cupboard/fridge right now!

 Pioneer Woman's White Chicken Enchiladas... I replace the chicken with 1 can of black beans, 1 can of pinto beans, and 2 cups of corn. This is the best white sauce I've ever tried though! I'm also dying to try it with retried beans!:

Here's what you need:

- 1 green bell pepper
- 1 red bell pepper
- 1 yellow bell pepper
(honestly you could use any combination of bell pepper but use 3)
- 1 medium onion
- 1 tablespoon of olive oil (or canola)
- 2 1/2 cups of shredded chicken (already cooked chicken)
- 3 cups of chicken broth
- 1 1/2 heavy cream
- 4 tablespoons of butter
- 1/4 cup of all-purpose flour
- 2 1/2 cups of grated Monterey Jack cheese (or cheddar or a blend of both)
- 1 cup of sour cream ( or plain Greek yogurt)
- 16 small tortillas (corn or flour, your choice, I do find the corn has a bit more flavour but it is a bit harder to find but i guess hat depends on where you shop)
- salt
- paprika

Optional:
- 1 or 2 jalapeno peppers (seeded and finely diced)

For serving/presentation:
- fresh cilantro
- fresh salsa (or diced tomato if it's in season - it's so delicious)
- sour cream or plain Greek yogurt

OK, let's get started!

1.  Grill your peppers on the BBQ or in the oven at the broiler setting.  Keep an eye on them and be sure to move them around but the skin should be black!

2.  Pre heat your oven to 350F - you will be baking your enchiladas

3.  Take your peppers off the grill (or out of the oven).  Let them sit for a bit and then core and see, remove the black skin (a little on the peppers is OK)


4.  Chop up your peppers and set aside.

5.  In a large skillet, saute your diced onion in the oil (and if you are adding jalapeno add it to the mix too.) Takes about 2-3 minutes

6.  Next add your chicken and add 1 cup of the chicken broth (you will be using the other 2 cup of broth later)

7.  Add 1 cup of heavy cream to your chicken (the rest of the cream will be used in the sauce)

8.  Add 1/2 tsp of paprika and some salt along with 1/2 of the chopped peppers (you will be using the other half of the peppers later).  Stir and let this mix cook for a bit (2-3 minutes) and then set aside

Now, it's time to make your sauce.....
9.  In another skillet, melt your butter on med-high heat

10.  Add your flour, sprinkle it in and whisk it with the melted butter, you will have a paste.

11. Add the remaining broth, and continue to stir.  stir until the mixture is smooth

12.  then add the rest of the heavy cream, add another 1/2 tsp of paprika, and 1 1/2 cups of the grated cheese.  Yes, this will be a creamy cheese sauce to pour over your beautiful enchiladas

13.  Next add the sour cream (or Greek yogurt) and the rest of the chopped peppers.  If the sauce is too thick add a bit more chicken broth.  be sure to taste your sauce - does it need salt? pepper? hot sauce? You decide. It should need to much extra flavour but you know what you like!

14.  I warm up my tortillas in the microwave, it makes them easier to roll. 

15.  Place a small amount of chicken mixture in the center of a tortilla, fold over the edges and place them seam side down in a baking pan. 

16.  Once your baking pan is full of rolled chicken enchiladas, pour that creamy cheesy sauce over the top.

17.  Sprinkle the top with the remaining cheese (if you want to add even more cheese, go for it!) and bake for about 20-25 minutes - make sure it is bubbly!  I often broil mine for an extra 2 minutes to get that golden finish but keep your eye on it!

You might find that this recipe takes some time but once you make these, even after one time, you will be much more comfortable and the next time it will be quicker and the time after that even quicker. 

You can serve with a green salad on the side or chopped veggies for the kids and have some fresh tomato salsa and sour cream too! You can garnish with green onion or fresh cilantro


Sunday, November 1, 2015

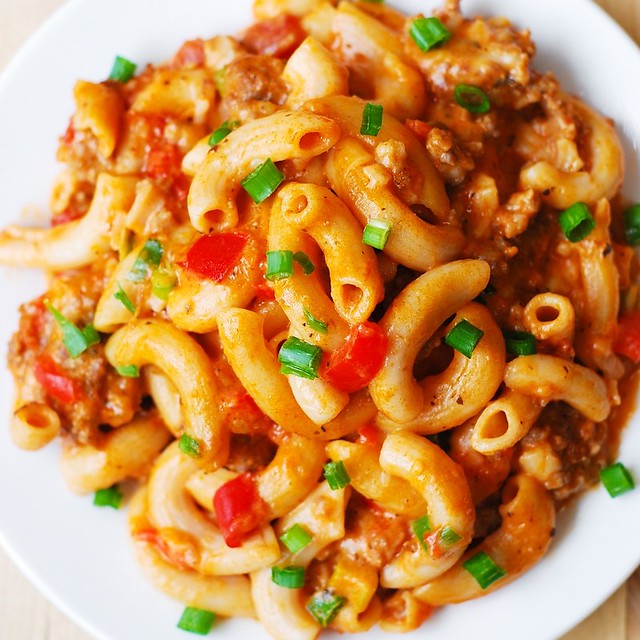
Mac 'n' Cheese Casserole -An Instant Family Favourite

Dinner time is tough!  My kids tastes seem to change daily and it's hard to keep up.  I'm often the one on dinner duty (as my husband if often home later in the day) so it's a bit stressful for me - the kids are tired and hungry and there's 4 of them!


The first time I made this casserole, they loved it ! They said it tasted just like pizza!  I have made it a few times since and I have modified the ingredients to suit what I had stocked in my cupboards and it still tasted incredible. But that's what I really like about this dish - the flexibility!  I also made this dish for a family going through a difficult time, and they not only appreciated the gesture but the entire family enjoyed this comforting meal. 

I like to serve it will a green salad on the side (or just some sliced veggies on the side for my kids) and it is just perfect!

there are some veggies in the dish and my kids don't seem to notice so even if they don't finish their side veggies, I know they are getting some in their main meal. Win!!

So what do you need for this dish? Chances are you have everything you need at home already!

- dry macaroni noodles
- tomato sauce or spaghetti sauce
- cheese
- bell peppers
- ground meat (beef or sausage)
- water
- milk or heavy cream
- spices (salt, pepper, onion salt, garlic powder, oregano)

Oh and the other part that I love about this dish....is the limited mess!  Only one skillet or pot needed and it only takes about 40 (10 minutes of prep and about 30 to cook)  minutes!

One-Skillet Mac and Cheese with Sausage and Bell Peppers

So here's how you do it.

1 - start by browning your meat.  be sure to season it to your taste.  I use salt, pepper, garlic salt, onion salt, Italian seasoning and a dash of hot sauce or red pepper flakes.  But you know your family best so season it the way you like. Drain the meat if necessary.

2 - Add 2 diced peppers.  You can use red, green, yellow or orange.   It's up to you! I like my peppers on the firm side not mushy so I don't let mine cook for too long before adding the next few ingredients

3 - Add 18 oz of your tomato or pasta sauce.  If you are using tomato sauce that is unseasoned be sure to add some more seasoning mainly salt and Italian seasoning.  Be sure to taste!  When you add something unseasoned to something already seasoned all it does is 'water' down the dish so be sure to taste and season!

4 - Next add 18 oz of water and 2 cups of dry macaroni.  Bring it to a boil and then turn the heat down to simmer.  This will take about 20 minutes, stir and check the pasta now and then you want it al dente not mushy.

5 - After about 20 minutes, add 1/3 cup of cream (or milk, either works) and sprinkle about 2/3 of a cup of grated cheese.  If you want that true pizza taste, I suggest mozzarella but cheddar is also great! Mix it all together - the milk and cheese should melt in the casserole

6 - You are now ready to serve.  

I'm going to make this again, maybe this week!

Monday, October 5, 2015

Thanksgiving Pumpkin Bread

The first time I had pumpkin bread was about 3 years ago.  We were on a family vacation in St.Simon's Island, GA (such an amazing family holiday) and we ate at a great restaurant (unfortunately the name escapes me) but we had the most incredible pumpkin bread!!  We all loved it! My parents, the kids, my husband - it was an instant favourite! I knew I had to find a recipe at home and bake it for everyone!

This is now something I bake very year for Thanksgiving but also just for the fall.  We see pumpkin everywhere, so this is a natural fit for the holiday.


This bread is a sweeter bread, almost like a cake (think banana bread but with pumpkin).  It's great with tea or coffee or even a dessert for someone who wants something other than pie.  You could add some nuts, raisins or chocolate chips.  I make it plain - it does stand up on it's own!

Here's what you need and what you need to do:

1 (15 oz) can of pumpkin puree
4 eggs
1 cup of vegetable oil
2/3 cup water
3 cups white sugar
3 1/2 cups of all-purpose flour
2 tsp baking soda
1 1/2 tsp salt
1 tsp ground cinnamon
1 tsp ground nutmeg
1/2 tsp ground cloves
1/4 tsp ground ginger

1. Preheat the oven to 350 degrees F.

2. Grease three 7x3 inch loaf pans

3. In one large bowl, mix together the pumpkin puree, eggs, oil, water, and sugar and make sure it is well blended.

4. In another medium bowl, mix the flour, salt, baking soda, cinnamon, cloves, nutmeg and ginger.

5.  Add the dry mix to the wet mix and blend them well - the mixture should be smooth and free of lumps.

6.  Pour the mix (once well blended) into the pans. Fill the pans about 2/3 full - you need some room for the bread to rise

7.  Bake for about 50 minutes - loves are done when a toothpick inserted in the center comes out clean


Tuesday, September 22, 2015

Easy No-Bake Energy Bites

So I know this is a pretty trendy item right now and I jumped on that band wagon this past week.  And you know what I really liked them and so did the kids (probably more than me).


What I like about these is they satisfy my sweet tooth and they take no time at all to make.  So if you are busy and don't have a lot of time these are for you.  Plus you can modify the recipe as you like.  I was missing some ingredients from this list so I improvised!  I was missing - chia seeds (I used flax seeds instead), I also didn't have ground flax seed (I used graham cracker crumbs instead not nearly as healthy but it cleared out my last box in my pantry) and I didn't toast my coconut.  The kids loved making these with me, too!

INGREDIENTS:

  • 1 cup (dry) oatmeal (I used old-fashioned oats)
  • 2/3 cup toasted coconut flakes
  • 1/2 cup peanut butter
  • 1/2 cup ground flax seed
  • 1/2 cup chocolate chips or cacao nibs (optional)
  • 1/3 cup honey or agave nectar
  • 1 tablespoon chia seeds (optional)
  • 1 teaspoon vanilla extract
No Bake Energy Bites -- these delicious bites are perfect for breakfast, snacking, even dessert! | gimmesomeoven.com #vegan

*Not my photo but mine looked just like this, really they did!!


DIRECTIONS:

  1. Stir all ingredients together in a medium bowl until thoroughly mixed. Cover and let chill in the refrigerator for half an hour.
  2. Once chilled, roll into balls of whatever size you would like. (Mine were about 1" in diameter.) Store in an airtight container and keep refrigerated for up to 1 week.
  3. Makes about 20-25 balls.
These aren't school friendly but I did make a school-safe version with WOWBUTTER.  I would use another table spoon or two, I find the WOWBUTTER drier than Peanut butter but they taste great!.  We also added raisins.  I didn't add any coconut either but added a bit more oats and flax seed.  The kids love bringing these to school! Plus they love telling everyone that they made them too! 

Thursday, August 13, 2015

Chocolate Chip Cookies

For anyone who thinks a Chocolate Chip Cookie is boring and they all taste the same, clearly has not tasted enough chocolate chip cookies in their life!

The Chocolate Chip cookie is a classic and a favourite.  Its' my go-to when I want to bake for the kids (and myself).  I know I always have the ingredients on hand.

I am always on the hunt for the best Chocolate Chip Cookie recipes and I would add this one to the list.


It has a great chewy center (as long as it is not over baked) and a 'crispy' exterior and it is perfect minutes out of the oven and pair with a cold glass of milk.

I always double the recipe - with 6 of us at home we go through food quickly and when it comes to homemade cookies, we go through them even quicker. Doubling the recipe is a great idea, if you are short on time and don't get to bake often.  Cookies freeze very well, so eat some now and freeze the rest for later!

This recipe will be in my regular rotation because the ingredients are so simple.

Here's what you need:

- 2 3/4 cups flour
- 1/2 teaspoon salt
- 1 1/4 teaspoons baking soda
- 1 1/4 cups butter
- 1 cup packed brown sugar
- 1/2 cup granulated sugar
- 1 teaspoon vanilla extract
- 1 large egg
- 12 ounces semi-sweet chocolate chips (I only had milk chocolate chips, they were also good and a combo of the two would be fabulous, perfect for a chocolate lover!)

- Pre heat your oven to 375 degrees
- Mix the flour, salt and baking soda in one bowl
- In another bowl mix your butter, sugars, vanilla and eggs and mix well together.
- Add the wet mixture to the dry mixture and stir.
- Add your chocolate chips and keep stirring until all of the mixture is well blended
- Using a table spoon, scoop out the dough and form into balls and place on a greases cookie sheet.
- My cookies were perfect at 14 minutes, slightly golden...

I doubled this recipe and it resulted in just over 3 dozen cookies.

And that's it! Pour yourself a glass of milk and enjoy! Might want to taste one minutes of the oven....you may not get another chance to grab one otherwise ;)


Monday, August 3, 2015

Refrigerator Garlic Dill Pickles

So I have never pickled anything, ever! My mom, aunts, sister they never pickled anything either.  I know my mother-in-law (who now lives in Texas) has lots of pickling experience but it would be a bit of a long trip to come up here to do some pickling with me! I came across a recipe for Sweet Pickles in a cookbook that I just purchased.  I plan on making those but the recipe seems a bit intense.  I came across this simple 'refrigerator pickle' recipe and thought it might be a good start into my new adventure.


I needed to buy a number of items so a bit of an expense at first but the good news is, these items can be re-used.  So I purchased some pint size mason jars, some labels, and a starter kit that includes a jar lifter, jar funnel, magnetic lid lifter and a head space tool.  So for 24 jars and the starter kit I think I paid no more than $30. I didn't need the starter kit for this 'refrigerator' style pickles but for canned pickles and jams (which I plan on attempting later this summer) I will!

The rest of the ingredients I had around the house already.  I did have to purchase some more cucumbers that usual but I think that's an obvious expense!

So here's what you need:

- whole all spice (although I bought ground all spice by accident)
- mustard seed
- dill (dry or fresh - I used fresh)
- bay leaves
- garlic
- salt
- sugar
- whole peppercorns
- red pepper flakes
- white vinegar
- water
- whole cloves
- celery seed
- cucumbers (I bought the mini ones and used about 4 per jar, sliced as spears)


I love the rustic look and feel of these pickles and I think they will really be a great side to a sandwich at lunch or at a BBQ dinner!

So I try to get my kids as involved as much as possible in the kitchen.  So I had them help make the spice mix for each jar of pickles.  We decided to make a 'test' batch of 3 jars, so we used 3 containers - one container of spices for each jar.

I have a great set of measuring spoons that are well indicated and colour coded so they are great to use with the kids.  They love to count and help!

So this is what you need for each jar
  • 3-5 pickling cucumbers per jar (depending on the size and how you cut them to fit in the jars)
  • 1 1/4 cups water
  • 1 cup vinegar (you can reduce this to 1/2 cup if you like less of a vinegar punch )
  • 1/4 teaspoon mustard seed
  • 1/4 teaspoon whole allspice (I didn't have whole all spice so I added ground all spice and it was fine)
  • 1/4 teaspoon celery seed
  • 1/4 teaspoon dill seed
  • 1/4 teaspoon red pepper flakes
  • 1/4 teaspoon whole cloves
  • 2 whole bay leaves
  • 1/4 teaspoon whole pepper corns
  • 2 crushed fresh garlic cloves(I had minced garlic I added 1 1/2 teaspoons of minced garlic but if you want the pickles to be very garlic-y add another 1/2 teaspoon)
  • 1 1/2 teaspoons dill (you can replace the dried with a couple of sprigs of fresh dill if you have access to it)
  • 1 teaspoon sugar
  • 1 tablespoon kosher salt
- the water, vinegar, sugar and salt are for the brine! See Step 5


Step 1: prepare your jars and lids according to your manufacture’s recommendations.  You can sterilize the jars in the dishwasher or a good HOT soapy water wash does the trick too.

Step 2: prepare your cucumbers.  Wash and slice the cucumbers. Take off the ends because there may still be a stem or flower leftover from picking.  You can half or quarter your cucumbers.  Some can even be left whole, all depending on your consumption likes.

Step 3: measure spices and add to the jar(s). Crush garlic and add to the jar(s). (- this was where the kids helped the most)

Step 4: add to jar(s) your sliced cucumbers.  Fill in as many as you can but make sure that the cucumber does not go above the 1 inch head of the jar.  This is to ensure that your cucumber is covered with liquid.  Squeeze them in…it’s ok! Now if your jar seems really full, like the cucumbers and spices aren't really moving when you shake them, don't worry in a day or two they will.


Step 5: in a sauce pan add in water, vinegar, salt, and sugar.  Heat on high, stirring until the salt and sugar are completely dissolved.  Taste the mixture…too salty…add a little more sugar…too sweet…add a little more salt…not enough vinegar…add more…too much vinegar…add water.  It’s easy to adjust according to your taste. *I added another teaspoon of sugar

Step 6 FOR REFRIGERATOR PICKLES: After the salt and sugar are dissolved, turn off heat and let rest till cool.  Once cooled, add the liquid to the jar(s) till the spaces surrounding the cucumbers are filled, leaving 1 inch head space between the liquid and the lid.  Place the jar(s) in the refrigerator and let sit for 5 to 7 days; each day giving the jar(s) a light shake distributing the spices.  It’s really hard to wait for these crisp tangy pickles…but if you can withstand the 5 to 7 day wait, you’ll be in for a great treat.  Pop open that jar and enjoy.  These pickles will keep in the refrigerator for up to a month.


Saturday, July 4, 2015

Summer Strawberry Pie

I love strawberries and so do my kids!  The summer is strawberry season and although I love the sweet and simple strawberry I really wanted to make a true summer dessert featuring the strawberry. We always drive by these amazing road side strawberry stands in the summer and treat ourselves to delicious,local strawberries. I bought 6 liters of strawberries! I know that's a lot but I knew we would need about 4 liters to bake 2 pies and the rest well between the kids and my husband the remaining 2 liters wouldn't last too long


To me pie is a real treat.  I don't often have time for making pies but this Friday I decide to set the afternoon aside to bake some strawberry pie with the kids. My hubby was out of town for business and was coming home later in the evening.  I thought this would be a special activity to distract the kids while they missed daddy but also a nice homemade treat from my husband!


We washed, hulled and cut the berries in half or quarters.  The ingredients for this pie are so simple - which is what a pie should be in my opinion!  I know many strawberry pies use JELLO but I wanted the true taste of summer. Don't get me know, my kids love JELLO but I really wanted to celebrate the strawberry in the summer dessert!

For one pie, you need:

- about 5 cups of strawberries (washed and halved or quartered) I actually went a little crazy with dicing so I have about 5 1/2 cups in each pie.
- 1/2 cup of sugar (if you want a sweeter pie add maybe another 1/4 cup)
- 3 Tablespoons of cornstarch (this is a thickening agent, no cornstarch? Use flour)
- 1/2 teaspoon of sea salt
 - 5 tablespoons of milk
- turbinado sugar (as needed - or granulated sugar)

Add to the strawberries and mix. My son Jameson loves to bake with me and he was a great help stirring the berry filling while I cleaned up the kitchen.


Now, I am not a pro at pie crusts - so I cheated! Which in the end turned out to be a good idea since hubby called and he was arriving about 2 hours early and I had to pack up all 4 kids to pick him up at the airport. I used frozen pie crust. A box with two shells (one for the top and one for the bottom). I let them thaw out a bit so that the one shell could slip out of the pie pant easily and be placed on top.   So once the berries were mixed I loaded up the bottom pie crust and evened them out as best I could.  I then placed the top pie crust on top, pinched the edges and then did a milk wash on top and sprinkled some sugar.  I recently discovered turbinado sugar, which is perfect for sprinkling on top of pies and turnovers.

Don't forget to use a knife to cut four slits/vent holes in the top crust.  This is necessary to let the steam escape and prevent the top crust from exploding.

Set your oven for 450 degrees, you will bake your pie at that temperature for about 10 minutes.  Then turn the temperature down to 350 degrees for about 25-30 minutes.  If your oven runs hot, check on the pie around 20 minutes

The end result a perfectly golden and delicious strawberry pie.  You can tell from my photo that I didn't pinch one seam tightly enough and the filling spilled out a bit.  I always bake pies on a cookie sheet to keep from spilling directly in my oven and having to clean the oven.

Overall this pie was a hit.  It is what summer should taste like - pure strawberries and just enough sweet.  Perfect served warm with cool whipped cream or cold vanilla ice cream on the side.

The perfect summer dessert!


Tuesday, May 19, 2015

Chewy Ginger Cookies - The 'Perfect Open House Cookie'

These are always a hit....my Chewy Ginger Cookies. I first fell in love with these at Starbucks - they were such a treat!  they still are but now I can make these at home for much less

I also make these for my husbands Open houses.  He is a real estate agent and he loves to bring a little taste of home with him to share with buyers. He says these are perfect because they are peanut free but also not messy!  No melted chocolate on fingers that could transfer onto walls or furniture.  these are always a hit! When I bake these I double the recipe and freeze them by the dozen - they freeze incredibly well


These are a perfect balance of spice and sweet and of course, my kids LOVE to bake these with me.


Ingredients : this make approx 36 cookies (depends on the size)

4 cups all-purpose flour, spooned and leveled
2 teaspoons baking soda
2 teaspoons ground cinnamon
1 teaspoon kosher salt
1 teaspoon ground nutmeg
1 teaspoon ground ginger
1/2 teaspoon ground cloves
1 cup (2 sticks) unsalted butter, at room temperature
2 cups packed light brown sugar
2 large eggs
1/2 cup molasses
1/4 cup canola oil
1/2 cup granulated or coarsedecorating sugar 


 Steps:
  1. Heat oven to 350° F. In a large bowl, whisk together the flour, baking soda, cinnamon, salt, nutmeg, ginger, and cloves; set aside.
  2. Using an electric mixer, beat the butter and brown sugar on medium-high until light and fluffy, 2 to 3 minutes. Beat in the eggs, then the molasses and oil.
  3. Reduce mixer speed to low and gradually add the flour mixture, mixing until just combined (do not over mix).
  4. Place the granulated sugar on a plate. Shape the dough into balls (about 2 tablespoons each) and, a few at a time, roll in the sugar to coat. Place 3 inches apart on baking sheets. My kids loves this part 
  5. Bake, rotating the baking sheets halfway through, until the edges are firm but the centers are still slightly soft, 16 to 18 minutes. Let cool slightly on the baking sheets, then transfer to a wire rack to cool completely. 

Tuesday, May 12, 2015

Crazy Ingredient Chocolate Chip Cookies

Who doesn't love a good chocolate chip cookie?

That's right No one!! 

These cookies are truly the best and have been very, very well received.  They are the right amount of decadent. 


This is a great recipe with an interesting secret ingredient and a great way to use up hard boiled eggs.  Yes, hard boiled eggs. I have served these to kids and grown-ups and no one can guess the 'crazy' ingredient.  I know you are probably thinking 'ewww, do these have chunks of eggs in them?' No, they don't so be sure to really finely chop or grind them down.  These cookies have a soft and buttery texture and of course, gooey and sweet chocolate.

They are a great way to use up any 'left over' hard boiled eggs (which do make for a quick and easy snack or breakfast).  If you are uncertain, make a dozen and give them a try - you won't be disappointed!


Here's what you need:

- 1 cup of butter (I melt mine in the microwave, easy!)
- 1 1/2 cup of brown sugar
- 2 hard boiled eggs (peeled and finely chopped)
- 1/2 teaspoon of salt
- 1/4 teaspoon of cinnamon
- 1 teaspoon of vanilla extract
- 1 teaspoon of baking soda
- 2 table spoons of oil
- 2 1/3 cups of all purpose flour
- 1 cup of semi-sweet chocolate chips
- 1 cup of milk chocolate chips ( I didn't have milk chocolate chips so I used Reese peanut butter chips instead)


Tuesday, May 5, 2015

Apple Ambrosia

I love dessert - my waist line does not.

But I just need to have something sweet after dinner.  Maybe it's how I grew up, I'm not sure but dinner just doesn't feel complete without a little something sweet.  As much as i love to bake some times I just don't have time but sometimes you don't want something super sweet, or baked or chocolate.  Not often.....lol but sometimes.

I saw this recipe on Food Network on Trisha Yearwood's show -while on a mini 'mommy and daddy' weekend away from the kids.  This was very different from the Ambrosia  dessert I remember seeing at family feasts and picnics.  The Ambrosia I remember and honesty, didn't like was a bunch of fruit in a bowl of cool whip or whipping cream.  I was not a fan.

 Betty's Apple Ambrosia from FoodNetwork.com

But apparently this is the 'real' Apple Ambrosia dessert.  I gave a try the other night and it was great!  Even my husband who isn't a big fan of fruit - loved it!

This is so easy - you can make it in advance just chill it in the fridge.  Plus I really liked this because it was all ingredients I typically have kicking around in my pantry and fridge.

Here's what you need: (serves 4) and here's what I did:

- 3 medium to large size sweet apples (I used Red Delicious - I would recommend a sweet apple over a tart one but you could have 2 sweet apples and 1 tart if you like a little tang)
- 1 can (14 oz) of pineapple (tidbits ideally, but you can dice up whatever you've got)
- 1 cup of orange juice
- 1/4 cup of sugar
- 1/2 cup of grated coconut

In a small to medium size bowl, add your orange juice.

Start grading your apples into the bowl (using the large grading holes).  If you like you can peel you apples, I left the peels on mine.

Open your can of pineapple, and add to the apples. 

Add the sugar to the bowl and mix.

Add 1/4 cup of the coconut and mix again - chill in the fridge until you are ready to serve.

Just before serving add the remaining coconut for a bit of extra crunch and serve.

It's a very fresh and fruity dessert that totally satisfied my sweet tooth - I will definitely make this again!

This would be perfect for pot luck gatherings or just a quick dessert for the family


Thursday, April 16, 2015

Perfect Peanut Butter Cookies

Peanut Butter cookies have fallen a bit out of fashion due to peanut and nut allergies.  They aren't allowed in most schools, daycares and some offices but for those of you that LOVE a good Peanut Butter cookie - give this recipe a try!


It is my go-to for Peanut Butter cookies and it is a hit with kids and adults!  I often make this on rainy days with the kids and double up the recipe and bring some to my husband's office staff - luckily no one at his Real Estate Brokerage has a peanut allergy!

My kids also love this recipe because they can help!  I know those of you reading this might be shocked to hear that I bake with my kids but they love it and I give them tasks that they can handle and experience success.  They love to learn about the different ingredients, follow the order of the recipe and even get their hands dirty! See below how I get my kids involved.  It's a lot of fun having them in the kitchen just be sure to always be supervising...


I don't know exactly where this recipe came from but it has moved around with me and has been passed along to friends and family....

Ingredients:

1 1/4 cup of flour
3/4 tsp of baking soda
1/2 tsp of baking powder
14 tsp of salt
1/2 cup of butter, soft or melted (I use the microwave)
1 cup of peanut butter (I use all natural because of the lower sugar content and you get a 'truer' peanut butter flavour - you can use smooth or crunchy it's up to you!)
3/4 cup of sugar PLUS more for rolling your cookies - to be explained
12 cup of firmly packed brown sugar
1 large egg
1 tbsp of milk
1 tsp of vanilla

Instructions:

1.  Preheat your oven to 350 degrees

2.  Line (with parchment) or grease 2 baking sheets

3.  In one mixing bowl (I use a larger mixing bowl) stir together the flour, baking soda, baking powder and salt.  Set aside for now.

4.  If you have a stand mixer use the mixer bowl and paddle attachment but I don't so I use a medium size bowl and a wooden spoon or silicone spatula - mix the butter (which I melt in the microwave) and the peanut butter until smooth and creamy, then add your sugars and mix until combined.  Next add the egg, milk and vanilla.  Mix again until smooth.

5.  Once the peanut butter mixture is well mixed, slowly add it to the flour mixture and stir together until the flour is no longer visible (now if you want to add chocolate chips - this is when I would add them and then mix again)

6.  In a small and shallow bowl, put a few table spoons of sugar for rolling your cookies.  (This step isn't necessary but it does add a little something to the cookie).  I use a table spoon to scoop out the cookie dough and then roll into smooth balls.  Once the dough is in balls, roll them in the sugar - this is the part my kids love!

7.  Next place them on the baking sheet, allowing some room for the cookies to spread out. I also push a small indent with a fork on my peanut butter cookies - this is a classic touch but again not necessary, it was originally used to flatten out the cookies but with this recipe it isn't needed but for a lot of people it's an 'identifier' of a Peanut Butter Cookie.

8.  Bake for about 10-12 minutes (mine were perfect at 11 minutes).  Don't over bake - they will be tough!  If the center of the cookies look slightly under done, it's OK - they aren't and they will firm up, let them rest and cool.


How I get my kids involved:

1.  I measure out ingredients and I get them to pour!  Their favourite ingredients to help with are vanilla, sugar and eggs.

2.  Explain to them what you are doing.  Tell them step by step.  They will listen and find it very interesting plus they are learning how cookies are made.

3.  List the ingredients and play 'memory'.  When you need an ingredient ask them - 'which one is the sugar?'  They will love playing with you and helping you.

4.  Have them roll the cookies with you.  Make sure they wash their hands - or else they can't handle the food - a perfect 'teachable moment' about germs and food safety.  You scoop out the dough and demonstrate how to roll it into balls.  They will love it!  Watch them closely as they then roll the balls in the sugar.

5.  Have them count the cookie balls, ask them "How many cookies are we making?'

6.  Let them be the taste testers - once they are baked (and cooled) let them be the official taste testers and get their feedback!